Wednesday, December 21, 2011

Birthday Celebration

It's been over a month since my last post so I have a lot to catch you up on. I'm anxious to share all the projects I've been doing for the birthday and holidays that are now upon us.

Many fun events have occurred over the last few months but let me start with the most important one. My little Bean turned 1!! Where does the time go? Her first year has gone so fast. My baby is growing. I'm such a proud mama!

In my last post I made a banner for her party and didn't show you the final product. Well, as promised here it is:

Her party was a Winnie the Pooh themed party. Complete with a 100 Acre Woods sign, Tiggers Terrific Lasagna, Kangas Fruit Kabobs, Poohs Lemon Honeycombes and Rabbits Garden Salad.

When it came to eating the cake, she was very cautious but quickly realized how tasty it was. She probably would have ate all the sugar bees on the cake if we didn't pull her away to open gifts.


We had such a great time watching her open presents and eat her cake. She loved looking at those tissue paper balls I had hanging from the ceiling. I was kind of fascinated with them too. They turned out great and only took 3 materials to make: Tissue paper, fishing line, & hooks.

I took a stack of about 20 sheets of tissue paper then folded it similar to a fan (1 inch folds back and forth until you have all the tissue folded.
 From there you use the fishing line to tie around the center of the tissue (above: where my finger is at).  Ensure it's snug but don't tighten it too tight or you could cut through the tissue paper. I then used scissors to cut the ends to a point or rounded edge. After securing the center I turned the tissue paper on it's side and began to pull up one piece of tissue at a time on each side (see below).

After Beans birthday then I really focused in on making more gifts for friends and family for the Christmas holiday. In my next post I'll update you on what those gifts are and how to make them. :) Talk at you soon!

Sunday, November 13, 2011

Weekend Projects

What a weekend! Not only did Hubby and I get a date night (movie: J Edger, dinner and Bean's birthday & Christmas shopping) but we also got a lot accomplished in regards to projects.

First of all, I want to ensure I update you on our home projects. A month or two ago we had new house doors installed (front and side; door and storm door). What do you think of our new front door? I love it!
Before

After

As for other home projects, this weekend, Hubby did a final mow of the lawn...which has our lawn looking so nice. And, while the temperature is still tolerable, he also got our Christmas lights up (First time ever and I'm so excited!!). Don't worry, we celebrate Thanksgiving at our house so they won't be turned on until after the fall holiday :)

I happened to get a few projects completed myself! One of those happens to be a holiday gift project. I can't share details with you just yet (Otherwise it won't be a surprise to those people getting the gift) but I will be sure to update you after the Christmas holiday. Another was our 'Jar of Thanks' (mentioned in the previous post) and a decor project for Bean's birthday in December.
 Jar of Thanks

I'm having a Winnie the Pooh birthday party for Bean in December with her parents, uncle, grandparents, and great grandparents all there to help celebrate the big '1'. Bean's birthday decor project is a Winnie the Pooh banner. I found a Winnie the Pooh book at Goodwill and got some ribbon from the fabric store. From there I found the pages I wanted to use and cut them out and used rubber cement to glue it to the ribbon. Yes, I said rubber cement...it still exists. You'll have to wait until December to see the final product and the rest of Bean's birthday celebration.
Have a great week and just remember, it's the last full work week before Thanksgiving so make it a good one!

Thursday, November 10, 2011

Photos of the Bean-ster

This is Bean's first fall so I just had to get some cute photos of her in a warm sweater playing in the leaves. It also gave me a chance to work on my photography skill.

A few weeks ago the weather was beautiful and the leaves were still very colorful. So, I took Bean outside to play in the leaves. She, of course, had to inspect the leaves and figure out why in the world these things were making so much noise every time she moved! After her approval, we had some fun.

(Enjoy the photos Grammy and Grandee!)

 
As the holidays near, I'm thinking about the traditions I want to start for my own growing family. I'm thinking one of our Thanksgiving traditions can be a 'Jar of Thanks'. Every day between now and Thanksgiving I'm going to write down one thing I'm thankful for (I'll see if I can convince Hubby to as well) and place it into a jar; then, on Thanksgiving, we can read them aloud. Bean can't tell us much in words at this point but I will still ask her and make sure we put something in the jar on her behalf.

Enjoy fall and all the wonderful things that come with it!
Sayonara!

Monday, October 31, 2011

Happy Halloween!!

HoPe It WaS sPooKtAcUlAr!!
 This was Bean's first beggars night so we wanted to make sure she had the full experience. Costume? Check. Trick-or-Treak bag? um....(I did throw that one together last minute with fuzzy fabric, safety pins and ribbon) Check. Trick? well, I did look one up just in case we get asked so, Check. Destination? Grandma n' Grandpa's, daycare & neighbors. In all, that's about 5 houses.

We started with the costume. I love those striped tights!
 She didn't mind the costume and loved her final look! See that big smile?
 Bean was totally in character and even moved like a ladybug on all fours! Bean liked looking in her little bag when treats were placed inside. She didn't smile a whole lot on our trick-or-treating adventure but she was very patient and loved watching all the other children walk about the neighborhood.


We had to have a photo of Daddy and Bean on this momentous evening!


....and I really wanted one too!!


Tuesday, October 25, 2011

Baby Food

So, I always thought I'd make my own baby food for my child. However, when the day came Bean was ready for baby food, I wasn't. I was still trying to figure out how to be a working mom (...sometimes I think I'm still trying to figure it out) so I felt my time was limited when it came to cooking extra food. I mean, I already had laundry, dinner, cleaning the kitchen and getting my child to bed before I could think about feeling exhausted. I had thought it was much easier to just go to the store and buy a jar of food for my child.

After about 4 months of baby food and realizing how much it was costing us, I thought to myself, not only will it save us a little money but I will know what is exactly going into my child's belly if I take a little extra time each week to make just one thing for her (plus, I know what I make her is made with lots of love). By doing this we can supplement the jarred baby food and/or solid table foods with some homemade baby food. I do have to say that jarred baby food is great for traveling and it's nice to buy the combination fruits or veggies for some variety.

I finally decided to started making my own baby food when the three of us went to the Downtown Farmer's Market a few weeks ago. I bought basil, butternut squash, and sweet potatoes. I bought enough butternut squash and sweat potatoes for baby food as well as a meal or two for our family. I ended up purchasing some basil to make homemade pesto. I figured while I was making baby food I might as well make pesto (what was I getting myself into).

That weekend, after the farmer's market, I baked the butternut squash, pureed it and poured it into ice cube tray's. This gave me cubes that are easy to store in a freezer bag. It also helps that I can just take 2 cubes out of the freezer, pop it in the microwave for a few seconds and, ta-da, it's ready!
After this great experience I thought, this was so easy! I actually had fun doing it so I thought I'd try pureeing up some breakfast food for Bean.

So, for about $6 I got a large bundle of bananas, a few pears, and two containers of raspberries. I already had organic plan yogurt at home that I'd planned to use for the breakfast purees as well. When I got home, I got started...
I started cutting up my bananas and pears, then added the plain yogurt. I blended it and poured the mixture into my ice cube trays. I still had an ice cube tray empty so I decide I'd make the raspberry puree next.
The raspberry puree had yogurt, berries and bananas. I leave my puree's a bit chunky since Bean is eating the stage 3 baby foods and doesn't need them so thinned down. It turned out good! I even made of of these puree's for myself this morning as 'breakfast' (I consider it a smoothy of sorts)!
I wish I would have started all this much earlier but, like I said, adjusting to being a mom is exhausting and so if you didn't, can't or haven't had the time to make your own baby food, don't feel bad. In my opinion, as long as your baby is getting the nutrition and love he/she needs, that's what matters :)

BTW, the pesto turned out great in the ice tray cubes and now I can use it for pasta dinners throughout the winter. I also had some fresh rosemary that I had growing through the summer. I ended up chopping it and storing it in the ice cube trays with some water for use of fresh herbs throughout the winter. Boy, I feel like I'm preparing for hibernation!

Tuesday, October 18, 2011

Perfect fall food

Cornbread!! Need I say more? I fell in love with this corn muffin recipe I found on the Food Network website. I did make a couple tweaks to the original recipe. but I found it to be pretty darn close to the muffins at Famous Daves - which are amazing! (Hubby thinks that comment is stretching it... but I obviously disagree)

Honey Cornbread Muffins

Ingredients


  • 1 cup yellow cornmeal
  • 1 cup all-purpose flour
  • 1 Tbsp baking powder
  • 1/2 cup granulated sugar
  • 1 tsp salt
  • 1 cup 2% milk
  • 2 large eggs
  • 1/2 stick butter, melted
  • 1/2 cup honey

Directions 

Preheat oven to 400 degrees F. Into a large bowl, mix the cornmeal, flour, baking powder, sugar, and salt. In another bowl, whisk together the whole milk, eggs, butter, and honey. Add the wet to the dry ingredients and stir until just mixed.


Place muffin paper liners in a 12-cup muffin tin. Evenly divide the cornbread mixture into the papers. Bake for 15 minutes, until golden. 

Happy baking!!

Monday, October 17, 2011

Yard Work

We've completed the first step of one of our important projects this past weekend... Landscaping! We had 5 evergreen bushes that needed tore out. My husband and father-in-law started to use a pick-ax to dig these out and finally decided to head to the hardware store to find a more efficient option. They found a tow strap and hook that they planned to tie around the bush stump and pull out with the Excursion.
 Here we have three stumps removed and two left.

They dug around the stump so that the tow strap can firmly fit around the base of it. Here's a video of the removal. I think the guys had a lot of fun tearing these things out. Anyone need stumps pulled out ;-)
Part 2 of the project is now buying soil to level the area and possibly getting something planted before winter. We will see how far we get over the next few weeks. Until next time, enjoy your time outside in this fall weather. Before we know it there will be snow on the ground!

Sunday, October 16, 2011

Pumpkin Patch

We finally took our trip to the pumpkin patch and boy what a beautiful day it was....
There he is. The love of my life driving us to Howell's Pumpkin Patch. What a handsome man he is.
 Here we are waiting in line to take the hay-rack ride out to the pumpkin patch. Lil' Bean kept these sunglasses on her face for about 3.2 seconds before trying to pull them off.
 On our way out to the pumpkin patch we passed this beautiful field of flowers so I just had to share the view.

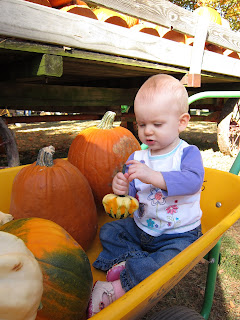
Once we got to the pumpkin patch we walked around for quite some time trying to find that perfect pumpkin. Well, we found it! Bean was interested in the pumpkin for about 5 seconds and interested in the dirt and vines for 5 minutes.

Once we got back from the pumpkin patch we found a couple other pumpkins and some gourds to take home with us. Bean was totally into the small gourds she could pick up herself. It was a lot of fun taking her and watching her take it all in. We will definitely be making the pumpkin patch experience a family tradition. What a great trip with my little family! Now to decide how to carve these baby's...

Wednesday, October 5, 2011

Reading in circles

Many of you may know that I enjoy reading (when I have time, of course, which can be few and far between). Regardless of how often I get to read, I think it's a very important part of who I am and therefore I have been looking for a way to show that in our home. You might think 'why doesn't she just display her favorite books in bookshelves?'. Well, if you've seen our home, you know we don't have a lot of room and built in bookshelves weren't a part of this 1980's layout. So I'd been waiting for the perfect project to come along and it did, about 6 months ago.

I found this wonderful blog post by Lindsay at Living With Lindsay. I fell in love with this wreath made from book pages (how perfect, right?) and decided to follow her tutorial to make my own. I think it turned out great! (Now, all I need is a little color on the wall...but that's another project.)

Monday, September 26, 2011

New tastes

As you most likely are aware, I like trying new foods and experimenting with my tastebuds...especially when there's a healthy alternative. A couple recent recipes I tried include a Waldorf Salad and brownies. The healthy spin on these is the fact the Waldorf Salad is made without the mayo and the brownies are made with black beans.

Waldorf Salad: I can't say this complete recipe came from my noggin but I did combine a few different recipes so I suppose I could say this my own version of this salad.

1 McIntosh apple; cored and cubed
1 Granny Smith apple; cored and cubed
1 celery rib, sliced thin
2/3 cup packed fresh mint leaves; washed, dried and chopped
1/2 cup dried cherries
1/4 cup cran-raisins
1/4 cup walnuts (or pecans)
2 scallions, chopped
3 tablespoons rice vinegar
3 tablespoons fresh orange juice
Lettuce

1. Combine all ingredients into a large bowl and toss well. Serve over lettuce.
Verdict: Thumbs Up! I've made this twice already. It's such a colorful dish and has so much flavor!

Here's a photo of my little chef practicing her mixing skills while I was making the Waldorf Salad. What a cutie!!


Brownies: I over heard someone at work talking about black bean brownies so I did a little research and here's what I found:

1 can of black beans
1 box brownie mix

1. Drain and wash the black beans. Place the black beans back into the can and fill can with water.
2. Place water and beans into blender and blend until smooth.
3. In a medium bowl, mix together brownie mix and blended black beans. Pour into a greased pan and follow baking instructions on your brownie mix box.

Verdict: Thumbs down. Once I took a bite, the only thing I could taste was beans so I wasn't a big fan of this recipe. These are suppose to be healthy for you but since they don't satisfy my tastebuds, I don't think I'll be making these again unless I can find a recipe that doesn't make these taste like beans. Thoughts anyone?

Tuesday, September 13, 2011

Finishing touches

So at the beginning of the summer, my husband and I decided we had some exterior house projects that we wanted to complete before summer ended and snow began to fall. The main project consisted of painting our house. This large task then lead to many other smaller tasks we wanted to do to the outside of our home. One thing leads to another, as I'm sure you know. These "to do's" consisted of tearing out some evergreen bushes, new house numbers, adding an American flag, and installing new doors. Now, not all of this is complete but we are getting there. The snow hasn't started falling yet, so we still have time.

As we were looking for paint colors I think we tested 4 colors of green/gray and 3 different trim colors. Once the decision was made to go with Connected Gray and Roman Column, we decided to wait until July when Sherwin Williams has their 40% of paint sale. We made sure we bought more than enough paint and only had a few can's tinted the house color and the trim. That way, if we didn't need all the paint we could return the un-tinted cans. If we needed more paint tinted we could bring it in and get the tint we needed with no extra charge (since we'd already bought the paint). We are very happy with the way the color turned out. You know you made a good choice when your neighbors tell you they really like the color. I think it's beautiful!

Thank you to my husband and my father-in-law for all their diligent work on completing the majority of the painting in one weekend.

Before:


Today:


Our house is becoming a home and I love it! Stay tuned and I'll post new photos as we complete our list of exterior "to do's".